

This Easter Bunny Cake is a fun and festive dessert perfect for Easter celebrations! Made with a moist and fluffy cake, topped with creamy frosting, and decorated to look like a cute bunny, this cake is sure to impress kids and adults alike. Whether you use a classic vanilla or a rich chocolate base, this cake is as delicious as it is adorable.
Why You’ll Love This Recipe
- Perfect for Easter – A show-stopping centerpiece for your Easter dessert table.
- Fun to decorate – Get creative with coconut, candies, and frosting to bring your bunny to life.
- Moist and delicious – A light, tender cake with rich frosting makes every bite irresistible.
- Kid-friendly – A great baking project for the whole family.
- Versatile flavors – Choose from vanilla, chocolate, or even carrot cake!
Ingredients

(Tip: You’ll find the full list of ingredients and measurements in the recipe card below.)
For the Cake:
- All-purpose flour
- Baking powder
- Baking soda
- Salt
- Granulated sugar
- Unsalted butter
- Eggs
- Vanilla extract
- Milk
- Sour cream (for extra moisture)
For the Frosting:
- Unsalted butter
- Powdered sugar
- Vanilla extract
- Heavy cream or milk
Decorations:
- Shredded coconut (for a fluffy bunny fur look)
- Pink and black candies (for eyes and nose)
- Marshmallows or construction paper (for bunny ears)
- Colored frosting or sprinkles (for extra decorations)
Directions
Step 1: Bake the Cake
- Preheat oven to 350°F (175°C). Grease and flour two 9-inch round cake pans.
- Mix dry ingredients – In a bowl, whisk together flour, baking powder, baking soda, and salt.
- Cream butter and sugar – Beat butter and sugar together until light and fluffy.
- Add eggs and vanilla – Mix in eggs one at a time, then add vanilla.
- Alternate wet and dry ingredients – Add dry ingredients in batches, alternating with milk and sour cream. Mix until just combined.
- Bake for 25-30 minutes or until a toothpick inserted in the center comes out clean. Cool completely.
Step 2: Shape the Bunny
- Cut one cake into ears and a bowtie – Leave one round cake whole (this will be the bunny’s face). Cut the second cake into two long ovals for ears, and use the remaining piece to create a bowtie.
- Arrange the cake – Place the round cake in the center, position the ears above, and the bowtie below on a serving tray.
Step 3: Frost and Decorate
- Frost the cake – Spread a thick layer of frosting over the entire cake.
- Add coconut – Sprinkle shredded coconut over the frosting to create a fluffy bunny effect.
- Decorate the face – Use pink and black candies for the eyes, nose, and mouth.
- Make the ears – Use marshmallows or paper cutouts for the inner ears.
- Personalize – Add colored frosting, sprinkles, or any other fun decorations!
Servings and Timing
- Servings: 10-12
- Prep Time: 30 minutes
- Cook Time: 30 minutes
- Total Time: 1 hour
Variations
- Chocolate Bunny Cake: Use a chocolate cake base instead of vanilla.
- Carrot Cake Version: Swap in carrot cake for a classic Easter flavor.
- Coconut-Free: Skip the coconut and use smooth frosting instead.
- Gluten-Free Option: Use a gluten-free flour blend.
- Mini Bunny Cakes: Make cupcakes and decorate them as mini bunnies instead!
Storage/Reheating
- Refrigeration: Store in an airtight container in the fridge for up to 3 days.
- Freezing: Freeze unfrosted cake layers for up to 3 months. Thaw and decorate before serving.
- Room Temperature: If unfrosted, store the cake at room temperature for 1 day.
FAQs
Can I make this cake ahead of time?
Yes! Bake the cake layers a day in advance and frost them when ready to serve.
What can I use instead of shredded coconut?
You can use white sprinkles or leave the frosting smooth for a different look.
How do I keep my cake from drying out?
Wrap the cake layers in plastic wrap before frosting to retain moisture.
Can I use store-bought cake mix?
Absolutely! A boxed cake mix can save time while still making a great bunny cake.
What frosting works best for this cake?
Cream cheese frosting or buttercream both work wonderfully.
How do I make pink bunny ears?
Use pink-tinted frosting, paper cutouts, or pink-colored sugar on marshmallows.
Can I add flavoring to the cake?
Yes! Almond extract, lemon zest, or coconut extract can add extra flavor.
How do I cut the cake easily?
Use a sharp knife and clean it between slices for neat cuts.
Can kids help with decorating?
Yes! Kids will love adding candies and sprinkles to bring the bunny to life.
How do I transport this cake?
Assemble it on a sturdy tray, and use toothpicks to secure any loose decorations.
Conclusion
This Easter Bunny Cake is a festive and fun dessert that’s as cute as it is delicious! Whether you’re making it for a holiday gathering or a baking project with the kids, it’s guaranteed to bring smiles to everyone’s faces. Try it this Easter and enjoy a sweet, bunny-shaped treat!
Print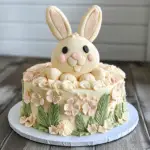
Easter Bunny Cake
- Prep Time: 30 minutes
- Cook Time: 30 minutes
- Total Time: 1 hour
- Yield: 12 servings 1x
- Category: Dessert
- Method: Baking
- Cuisine: American
- Diet: Vegetarian
Description
This Easter Bunny Cake is a fun and festive dessert that’s as adorable as it is delicious! Made with moist vanilla or carrot cake layers, frosted with creamy buttercream or cream cheese frosting, and decorated with coconut, candy, and marshmallows, this cake is the perfect centerpiece for your Easter table. It’s easy to make and guaranteed to bring smiles!
Ingredients
For the Cake: (Choose your favorite flavor!)
- 2 1/2 cups (310g) all-purpose flour
- 2 1/2 tsp baking powder
- 1/2 tsp salt
- 1 cup (226g) unsalted butter, softened
- 1 3/4 cups (350g) granulated sugar
- 4 large eggs
- 1 tbsp vanilla extract
- 1 cup (240ml) whole milk
Optional Variation: Substitute with a carrot cake base for extra Easter flavor!
For the Frosting: (Choose one!)
-
Vanilla Buttercream:
- 1 cup (226g) unsalted butter, softened
- 4 cups (480g) powdered sugar
- 2 tsp vanilla extract
- 2–3 tbsp milk or heavy cream
-
Cream Cheese Frosting:
- 8 oz (226g) cream cheese, softened
- 1/2 cup (113g) unsalted butter, softened
- 2 1/2 cups (300g) powdered sugar
- 1 tsp vanilla extract
For Decoration:
- 2 cups shredded coconut (for fur)
- Pink food coloring (for bunny ears)
- Large marshmallows (for cheeks)
- Pink jelly bean or pink M&M (for nose)
- Black or brown licorice strings or chocolate chips (for whiskers & eyes)
Instructions
Make the Cake:
- Preheat oven to 350°F (175°C). Grease and flour two 9-inch round cake pans.
- Mix dry ingredients: In a medium bowl, whisk together flour, baking powder, and salt.
- Cream butter & sugar: In a large bowl, beat butter and sugar until light and fluffy. Add eggs one at a time, then mix in vanilla.
- Combine: Gradually add dry ingredients, alternating with milk, mixing until just combined.
- Bake: Divide batter evenly between cake pans and bake for 25-30 minutes or until a toothpick inserted in the center comes out clean.
- Cool: Let cakes cool in the pans for 10 minutes, then transfer to a wire rack to cool completely.
Assemble the Bunny Shape:
- Cut one cake round into ears & a bowtie:
- Leave one cake round whole (this is the bunny’s face).
- Cut the second cake into two ear shapes from the top sides.
- The remaining center piece becomes the bowtie.
- Arrange the cake: Place the full round in the center of a large tray. Attach the ears at the top and the bowtie at the bottom.
Frost & Decorate:
- Frost the entire cake with buttercream or cream cheese frosting.
- Create the bunny fur: Press shredded coconut all over the frosted cake.
- Decorate the face:
- Use large marshmallows for the bunny’s cheeks.
- Add a pink jelly bean or M&M for the nose.
- Use chocolate chips or black licorice for the eyes and whiskers.
- Add pink ears: Dye a little coconut pink and press it into the center of the ears for a cute bunny effect!
- Decorate the bowtie: Use pastel M&Ms or sprinkles to make a fun, colorful bowtie.
Notes
Make-Ahead: Bake the cake layers a day ahead and store them wrapped in plastic at room temperature.
Storage: Store in the fridge for up to 3 days. Let sit at room temperature for 15 minutes before serving.
Nut-Free Option: Skip the coconut and use smooth frosting instead.
Chocolate Version: Swap out the vanilla cake for a rich chocolate cake base!
Your email address will not be published. Required fields are marked *