
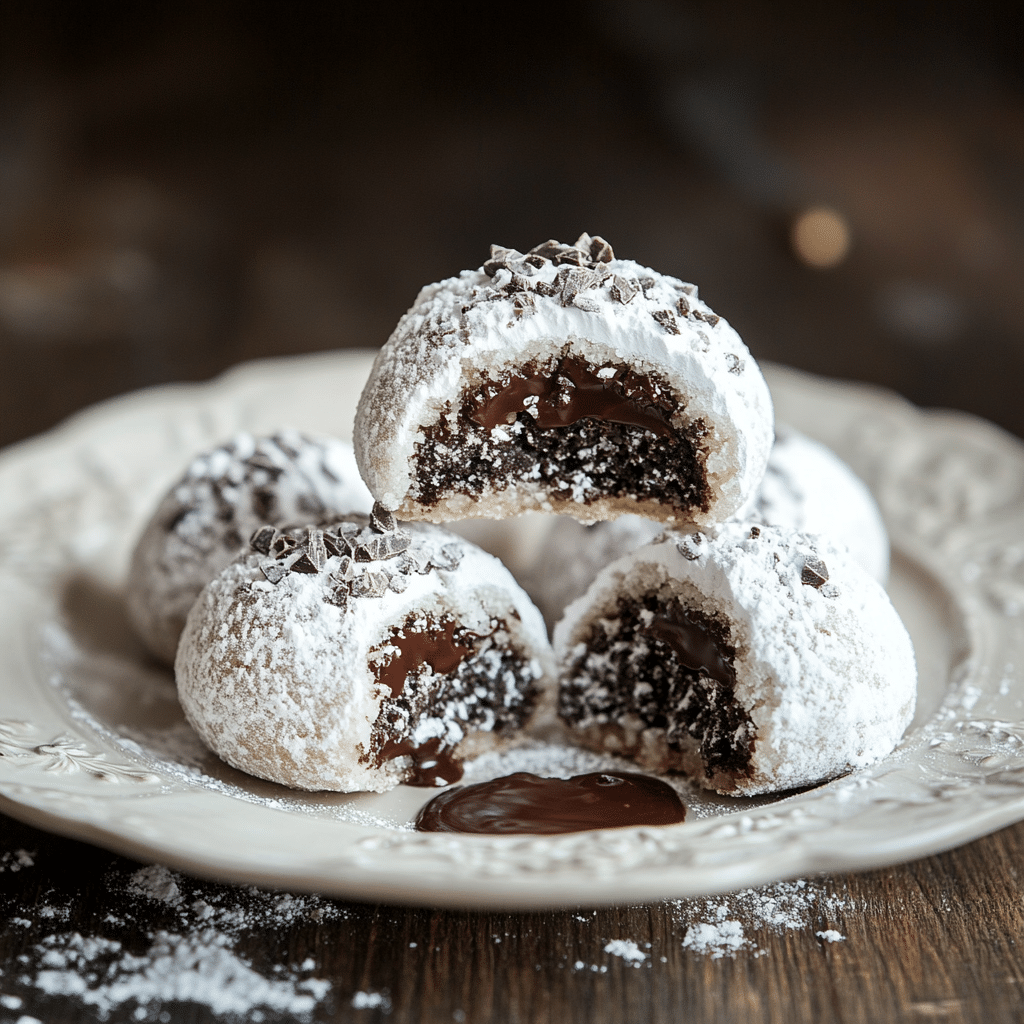
These Chocolate Snowball Cookies with Melted Chocolate Centers are rich, buttery cookies with a fudgy, chocolatey surprise inside. Dusted with powdered sugar for a snowy effect, they are the perfect winter treat for holiday gatherings, cookie exchanges, or just a cozy chocolate indulgence!
Why You’ll Love This Recipe
- Melty Chocolate Center – A gooey surprise in every bite.
- Buttery & Rich – A classic snowball cookie with a chocolatey twist.
- Perfect for the Holidays – They look just like little snowballs!
- Easy to Make – Simple ingredients and minimal prep time.
- Make-Ahead Friendly – Stores well for easy holiday baking.
Ingredients

(Tip: You’ll find the full list of ingredients and measurements in the recipe card below.)
For the Cookies:
- Unsalted butter (softened)
- Powdered sugar
- Vanilla extract
- All-purpose flour
- Cocoa powder
- Salt
- Mini chocolate truffles or chocolate chunks (for the center)
For Rolling & Dusting:
- Powdered sugar (for rolling and dusting)
Directions
Step 1: Prepare the Dough
- Preheat oven to 350°F (175°C). Line a baking sheet with parchment paper.
- Cream butter & sugar – In a large bowl, beat softened butter and powdered sugar until light and fluffy.
- Add vanilla – Mix in vanilla extract.
- Incorporate dry ingredients – Sift in flour, cocoa powder, and salt. Mix until a soft dough forms.
Step 2: Shape & Fill the Cookies
- Scoop dough – Take about 1 tablespoon of dough and flatten it in your palm.
- Add chocolate center – Place a mini chocolate truffle or chocolate chunk in the center.
- Seal & roll – Wrap the dough around the chocolate and roll into a ball. Repeat with remaining dough.
Step 3: Bake
- Place on baking sheet – Space cookies about 1 inch apart.
- Bake – Bake for 10-12 minutes, or until the cookies are set but still soft.
- Cool slightly – Let cookies sit for 5 minutes before rolling in powdered sugar.
Step 4: Coat in Powdered Sugar
- First roll – While warm, roll cookies in powdered sugar for the first coating.
- Cool completely – Let cookies cool fully before rolling in powdered sugar again for a snowy finish.
Servings and Timing
- Servings: 18-20 cookies
- Prep Time: 15 minutes
- Cook Time: 12 minutes
- Total Time: 27 minutes
Variations
- Peppermint Chocolate Snowballs – Add crushed peppermint to the dough or use peppermint truffles.
- Nutty Version – Mix in finely chopped hazelnuts or pecans for extra crunch.
- Spiced Chocolate Snowballs – Add a pinch of cinnamon or cayenne for warmth.
- Dark Chocolate Lovers – Use extra dark chocolate chunks for an intense flavor.
- White Chocolate Centers – Fill with white chocolate truffles for contrast.
Storage/Reheating
- Room Temperature: Store in an airtight container for up to 5 days.
- Refrigeration: Keeps fresh in the fridge for up to a week.
- Freezing: Freeze unbaked dough balls for up to 2 months. Bake straight from frozen, adding 1-2 minutes to the baking time.
- Serving Tip: Let chilled cookies sit at room temperature for a few minutes before eating for a softer texture.
FAQs
Why did my cookies crack?
Overbaking or dry dough can cause cracks—make sure to bake just until set.
Can I use store-bought truffles?
Yes! Lindt, Ferrero Rocher, or any mini truffles work great.
How do I get a gooey center?
Use soft chocolate centers like ganache or truffles instead of hard chocolate chunks.
Can I make these gluten-free?
Yes! Use a 1:1 gluten-free flour substitute.
Can I make these ahead of time?
Absolutely! Store unbaked dough in the fridge or freezer and bake when ready.
Do I have to roll them twice in powdered sugar?
Rolling twice helps create the classic snowy look, but you can skip the second roll if desired.
Can I add espresso powder for more depth?
Yes! A teaspoon of espresso powder enhances the chocolate flavor.
What’s the best way to coat cookies evenly?
Use a bowl of powdered sugar and gently toss the cookies while they’re still warm.
Can I add a hint of salt to balance the sweetness?
Yes! A pinch of flaky sea salt enhances the flavor.
How do I make them extra festive?
Sprinkle edible glitter or crushed candy canes over the powdered sugar.
Conclusion
These Chocolate Snowball Cookies with Melted Chocolate Centers are a dreamy holiday treat with a rich, fudgy core and a snowy powdered sugar coating. Whether for holiday baking or an everyday indulgence, these cookies will be a hit with chocolate lovers. Try them today and enjoy the magic of homemade truffles in cookie form!
Print
Chocolate Snowball Cookies with Melted Chocolate Centers
- Prep Time: 15 minutes
- Cook Time: 12 minutes
- Total Time: 57 minutes
- Yield: 24 cookies 1x
- Category: Dessert
- Method: Baking
- Cuisine: American
Description
These Chocolate Snowball Cookies are soft, buttery, and packed with chocolate flavor. Each bite reveals a melted chocolate center, making them a delightful treat for the holidays or any time you’re craving chocolate!
Ingredients
For the Cookies:
1 cup (2 sticks / 225g) unsalted butter, softened
1/2 cup (100g) granulated sugar
2 tsp vanilla extract
2 cups (250g) all-purpose flour
1/3 cup (30g) unsweetened cocoa powder
1/2 tsp salt
1 cup (100g) finely chopped nuts (pecans or walnuts, optional)
24 chocolate chunks or chocolate truffles (for the melted center)
For Coating:
1 cup (120g) powdered sugar
Instructions
Make the Dough
- Cream Butter & Sugar – In a large bowl, beat the butter and sugar until light and fluffy (about 2 minutes).
- Add Vanilla – Mix in vanilla extract.
- Combine Dry Ingredients – In a separate bowl, whisk together flour, cocoa powder, and salt. Gradually mix into the wet ingredients until combined.
- Fold in Nuts (Optional) – Stir in finely chopped nuts if using.
2. Shape & Fill the Cookies
- Scoop Dough – Roll about 1 tablespoon of dough into a ball.
- Add Chocolate Center – Press a chocolate chunk or truffle into the center and wrap the dough around it, rolling it into a smooth ball.
- Chill – Place the cookies on a parchment-lined baking sheet and refrigerate for 30 minutes (this helps prevent spreading).
3. Bake the Cookies
- Preheat Oven – Preheat to 350°F (175°C).
- Bake – Arrange cookies 2 inches apart on a baking sheet and bake for 10–12 minutes, until just set.
- Cool Slightly – Let the cookies cool for 5 minutes before rolling in powdered sugar.
4. Coat & Serve
- Roll in Powdered Sugar – While still warm, roll cookies in powdered sugar to coat them completely.
- Let Cool – Once cooled, roll them a second time in powdered sugar for a beautiful snowy finish.
Notes
- For extra gooey centers, use soft chocolate truffles like Lindt or ganache-filled chocolates.
- Want a boozy twist? Add 1 tbsp of Baileys or Kahlúa to the dough.
- Storage: Store in an airtight container at room temperature for 5 days, or freeze for up to 3 months.
Your email address will not be published. Required fields are marked *